Category: PC

  • Windows 10 upgrade without errors

    We have been trying to install the Windows 10 upgrade for days now. After countless tries all we would end up with is errors like the dreaded 80240020 and 80080080 errors.

    But in the end the easiest way for us was to bypass Windows Update and swing over to the Microsoft download site and download a small 17MB file that upgraded to Windows 10 easily.

    All you have to do is choose which version you need 32 or 64 bit, this will download a Media Creation Tool. After you run this, you just sit back and it will install.

    Although it gives you the option of creating an install DVD or USB stick, after we chose upgrade this PC we didn’t do anything else.

    Here is the page
    https://www.microsoft.com/en-us/software-download/windows10

  • How to fix Windows boot errors winlogon.exe and Bad Image messages

    We just upgraded our Mac Parallels to version 10 and everything seemed ok. But when trying to boot the Windows 7 image it hangs and displays winlogon.exe, Bad Image.
    The Monkey fixed this first by running Mac’s built in Disk Utility and running a Repair Disk Permissions.

    That helped to actually boot into Windows but we were still getting an error regarding KbdPrlUS.dll.
    After many Internet searches that turned up nothing we figured this DLL was not part of a standard Microsoft Windows install but installed but Mac Parallels software.

    So we did a search for KbdPrlUS.dll and found 2 place it existed. We deleted both.

    Then restarted and all error messages were gone. We then finished the Parallels install by installing Coherence software. You can tell if this is not installed if there is a yellow warning symbol Screen Shot 2014-09-20 at 6.13.15 PM in the Parallels tool bar. Screen Shot 2014-09-20 at 6.13.53 PM

    Be aware that after you click the warning symbol and choose install, you may have to go to your CD drive in Windows and then clicking Install. After a restart Windows should be running in full Coherence mode and blend in with your Mac.

  • Hotel WiFi sharing with multiple devices

    We have been looking for the best way to handle all our devices in hotel rooms and its been difficult. Sometimes hotels will give you a password which is good for only one device, but we usually have a tablet, laptop and not to mention our mobile gear. Here’s how the Monkey makes sure he can connect all the gear he needs.

    (more…)

  • How does Photo Stream work?

    Photo Stream is a new feature of iOS 5 and iCloud. But it’s simplicity and lack of a preferences can be confusing to use.

    The first step is to enable Photo Stream on your devices.

    Mac users will want to go to the iPhoto preference panel.
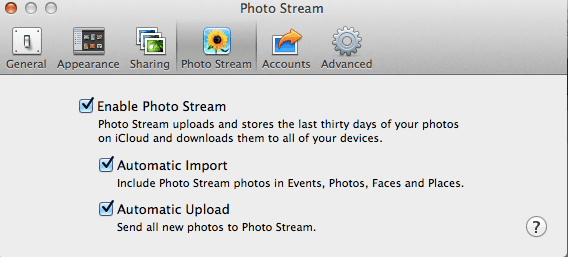
    Mac Photo Stream


    iPhone and iPad users can enable Photo Stream by touching Settings, and then iCloud
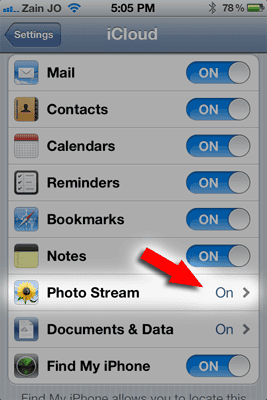
    iPhone Photo Stream

    Now think of Photo Stream as a special Album, one that updates and maintains automatically with the following rules.

    1. This album can hold up to 1,000 photos maximum.
    2. It will only show photos from the last 30 days
    3. Photos can not be edited or deleted.
    4. Photos taken with your camera are automatically added.  
    5. You CAN NOT pick and choose what images to keep or delete

    Any photo you intend to keep should be imported into your iPhoto library within 30 days. Otherwise it will be deleted after that. Also after importing you can do anything you normally can do; edit colors, email images, etc. But keep in mind if you delete the photo from your library it does not delete it from Photo Stream.

    Photo Stream is just a convenient way to see all your images on all your devices without worrying about syncing. It’s all automatic, but once again, with this simplicity you loose granular control. This brings us to possible negatives of Photo Stream.

    If you take a photo you want to keep private, you have to delete ALL photos by reseting Photo Stream.

    1. From a computer browser, go to icloud.com and sign in.
    2. Click on your name on the iCloud home page (this is the page that shows all the app icons). If you do not see your name, click the cloud icon in the top left of the page.
    3. Click Advanced.
    4. Here you will see the Reset Photo Stream button. Clicking this button will remove all your Photo Stream photos from iCloud. Once removed, they cannot be recovered, but you can re-upload any photos you’d like to restore to your Photo Stream from a Mac or PC.

    As long as you keep these limitations in mind, Photo Stream is a very easy way to sync images across multiple devices. Just don’t expect to be able to modify the contents manually.
  • Transfer iPhone photos to a PC

    Transferring images from your iPhone to a Windows PC is very easy to do and you don’t need to use iTunes or any other software.

    1 Plug your iPhone to your PC using the USB cable

    You should see the AutoPlay window popup,

    iphone_autoplay

    2 Click Open device to view files

    This opens up a window and you can simply drag and drop images from the phone to your desktop or anywhere you like.

    If you don’t get the AutoPlay window, try this way instead;

    1 Click Start, and choose My Computer

    You should see your iPhone as a digital camera or drive similar to the example below, simply click on it to open and view images.

    2 Select images to drag and drop from the phone to your desktop or anywhere you like.

    See this for simple ways to transfer to a Mac