Tag: photo

  • Taking a photo on your iPhone is best quality when using the built in camera app, and way safer.

    These days camera phones are all being compared to determine which has the best quality. But you should know its not just about the hardware and megapixel size, a lot has to do with the software used to snap the picture. Take a look at the photos below, both taken on an iPhone 8 plus.


    This photo was taken with the Line app, a popular way to communicate in southeast Asia.

    And here is the same photo taken with the built in Camera app.


    Its clearly better, with warmer, realistic colors and detail. Why? Because Apple spends countless funds and time to create software to get the most out of the imaging sensor. These days the hardware and software work together, and companies like Apple and Google want their cameras to be the best, they know many people decide on phones sometimes by the camera alone. So they have the research to make quality software to take the best images. Your social media app spends their time and money researching how to make money with advertising and uses basic image capture, which gives basic quality.

    So if you want the best images, use the built in camera camera app regardless of Apple or Android, its designed to give you the best results. Ofcourse some quality apps designed for photography will also give unique and beautiful images with filters. But most social and communication apps may give you stickers and floating rainbows, they are not designed for quality.

    Another huge benefit is by reducing apps’ permissions to the camera, you are increasing your privacy on your device.
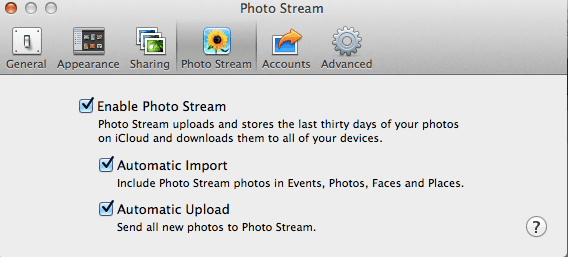
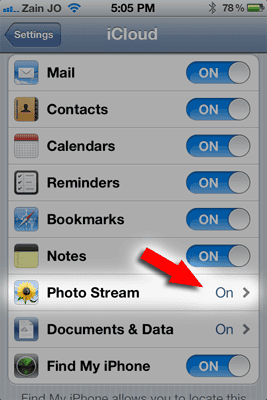
  • How does Photo Stream work?

    Photo Stream is a new feature of iOS 5 and iCloud. But it’s simplicity and lack of a preferences can be confusing to use.

    The first step is to enable Photo Stream on your devices.

    Mac users will want to go to the iPhoto preference panel.

    Mac Photo Stream


    iPhone and iPad users can enable Photo Stream by touching Settings, and then iCloud

    iPhone Photo Stream

    Now think of Photo Stream as a special Album, one that updates and maintains automatically with the following rules.

    1. This album can hold up to 1,000 photos maximum.
    2. It will only show photos from the last 30 days
    3. Photos can not be edited or deleted.
    4. Photos taken with your camera are automatically added.  
    5. You CAN NOT pick and choose what images to keep or delete

    Any photo you intend to keep should be imported into your iPhoto library within 30 days. Otherwise it will be deleted after that. Also after importing you can do anything you normally can do; edit colors, email images, etc. But keep in mind if you delete the photo from your library it does not delete it from Photo Stream.

    Photo Stream is just a convenient way to see all your images on all your devices without worrying about syncing. It’s all automatic, but once again, with this simplicity you loose granular control. This brings us to possible negatives of Photo Stream.

    If you take a photo you want to keep private, you have to delete ALL photos by reseting Photo Stream.

    1. From a computer browser, go to icloud.com and sign in.
    2. Click on your name on the iCloud home page (this is the page that shows all the app icons). If you do not see your name, click the cloud icon in the top left of the page.
    3. Click Advanced.
    4. Here you will see the Reset Photo Stream button. Clicking this button will remove all your Photo Stream photos from iCloud. Once removed, they cannot be recovered, but you can re-upload any photos you’d like to restore to your Photo Stream from a Mac or PC.

    As long as you keep these limitations in mind, Photo Stream is a very easy way to sync images across multiple devices. Just don’t expect to be able to modify the contents manually.

  • Transfer iPhone photos to a PC

    Transferring images from your iPhone to a Windows PC is very easy to do and you don’t need to use iTunes or any other software.

    1 Plug your iPhone to your PC using the USB cable

    You should see the AutoPlay window popup,

    iphone_autoplay

    2 Click Open device to view files

    This opens up a window and you can simply drag and drop images from the phone to your desktop or anywhere you like.

    If you don’t get the AutoPlay window, try this way instead;

    1 Click Start, and choose My Computer

    You should see your iPhone as a digital camera or drive similar to the example below, simply click on it to open and view images.

    2 Select images to drag and drop from the phone to your desktop or anywhere you like.

    See this for simple ways to transfer to a Mac

  • Transfer photos from iPhone to Mac easily using Image Capture

    Another easy way to transfer images from your iPhone to your Mac is with a built in app called Image Capture

    1 Plug your iPhone to your Mac using the USB cable

    2 Start Image Capture, a free app that comes with your Mac

    3 You should see your iPhone selected and image previews.

    image capture

    You can select individual images or import all at once. At the bottom you can select where the images are copied to.

    On the left side you can also select to delete images after import, and also a default program to run when you connect the iPhone.

    Also an easy way to transfer images is with Preview

  • Transfer photos from iPhone to Mac easily using Preview

    What’s the fastest and easiest way to transfer photos from your iPhone to your computer?

    Using the Mac there are 2 very easy ways, the first is using the built in Mac app called Preview.

    An interesting note, you don’t have to unlock the phone to transfer images using these methods. A convenience in one respect but also somewhat of a security flaw to keep in mind.

    1 Plug your iPhone to your Mac using the USB cable

    2 Start Preview, a free app that comes with your Mac.

    preview_icon

    3 Select Import from your iPhone from the File menu,

    import to preview

    At this point you can select all the pictures or choose individual images,

    Preview selects iPhone

    4 Choose a destination for the image, and your finished.


    After your image is copied to the destination it also opens in Preview.

    Another great way to transfer images is with Image Capture